If you have spray foam in your loft, you are probably wondering how it gets removed — and whether it is something you can do yourself.
This guide walks you through exactly how professional spray foam removal works, why the process matters, and what happens at each stage. By the end, you will know what to expect and what questions to ask before any work begins.
Can You Remove Spray Foam Yourself?
This is the first question most homeowners ask — and it deserves a straight answer.
No. Not safely, and not in a way that your mortgage lender or surveyor will accept.
Here is why:
Spray foam bonds directly to roof tiles, timber rafters, and breathable membrane. It does not peel away cleanly. Forcing it off without the right technique cracks tiles, tears the membrane underneath, and can split or splinter the timber rafters it is stuck to. The repair bill for that kind of damage — new felt, replacement tiles, timber treatment — can easily cost more than professional removal would have in the first place.
Beyond the structural risk, spray foam contains chemical compounds including isocyanates. When you cut, scrape, or break spray foam, it releases fine dust and particles into the air. Without proper respiratory equipment and dust containment, you are breathing in hazardous material and spreading it through your home.
And finally — even if you manage to physically remove the foam yourself — you will not receive the written documentation your lender needs to reconsider your mortgage application. A completion certificate from a qualified specialist is what lenders and surveyors ask for. A DIY job does not produce one.
Professional removal is the only route that solves the problem completely.
Step 1: Initial Assessment
The process starts before anyone sets foot in your loft.
When you contact a spray foam removal company, they will ask for basic information about your property — the type of house, the size of the loft, and whether the foam is confirmed or suspected. Some companies offer a free online estimate at this stage, giving you an early indication of likely costs.
This initial step helps establish whether a full survey is needed first, or whether removal can be quoted and scheduled directly.
Step 2: Spray Foam Survey
For most properties, a professional survey comes before removal. This is not just a formality — it is a genuinely important step that shapes everything that follows.
During the survey, a specialist visits the property and inspects the loft space in detail. They are looking at:
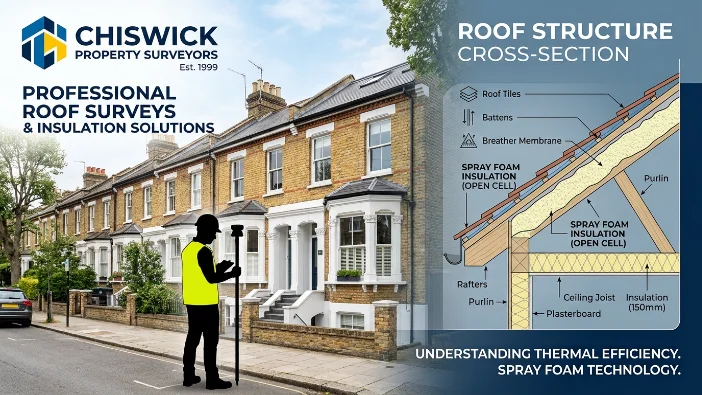
Foam type — open-cell or closed-cell. This affects the removal method, the difficulty of the job, and the cost. Open-cell foam is softer and easier to detach. Closed-cell foam is rigid and bonds more aggressively to surfaces.
Coverage and thickness — how much of the roof structure is covered, and how thickly the foam has been applied.
Roof structure condition — the visible condition of rafters, tiles, and membrane where accessible. If the foam has been in place for years and has trapped moisture, there may be signs of damp or early timber decay that need to be addressed during or after removal.
Access — loft hatch size, roof pitch, and whether there are any obstructions that will affect how the work is carried out.
After the survey, the specialist explains the findings in plain language and advises on the recommended course of action. At this stage there is no obligation to proceed. You can see exactly how we approach this in our full process breakdown.
Step 3: Quotation and Scheduling
Once the survey findings are clear, you receive a written quotation covering the full scope of work — what will be removed, how long it will take, and the total cost.
Typical timescales for removal are 2 to 5 days depending on house size and foam type. If you have a mortgage deadline, remortgage date, or property sale timeline, a good company will schedule the work around that.
Step 4: Safety Setup on the Day
On the first day of removal, before any foam is touched, the team sets up correctly. This step is easy to overlook but it matters.
Proper setup includes:
Respiratory protection — spray foam removal produces fine dust and chemical particles. All operatives wear appropriate respiratory equipment throughout the job.
Dust containment — the loft hatch and surrounding area is sealed off to prevent dust spreading into the living space below. This protects your home and the people in it.
Ventilation — the loft space is properly ventilated during the work to manage airborne particles and maintain safe working conditions.
Skipping or rushing this stage is one of the signs of a poor operator. If a company arrives and goes straight to scraping without any safety setup, that is a red flag.
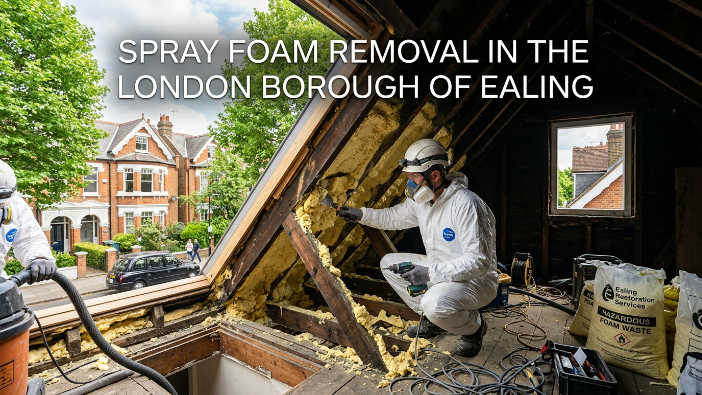
Step 5: Controlled Foam Removal
This is the main phase of the job — and the part that takes the most time.
Specialists use a combination of hand tools, scrapers, and cutting equipment to carefully detach the foam from the surfaces it has bonded to. The approach varies depending on foam type.
Open-cell foam removal — because open-cell foam is softer, it can often be cut away in sections and peeled back from the timber and tile surface with less risk of damage. It is still painstaking work, but the bond is weaker.
Closed-cell foam removal — this is more complex. Closed-cell foam is rigid and has a very strong bond. Removal requires more careful, controlled work to avoid cracking tiles or damaging the rafters underneath. The foam is cut into manageable sections and worked away from the surface methodically.
Throughout this process, the team is protecting the roof structure. The goal is to remove all foam while leaving tiles, rafters, and membrane in the best possible condition.
Step 6: Full Clean-Up and Debris Removal
Once the foam has been detached, the loft space is thoroughly cleaned.
All foam debris, dust, and waste material is collected and removed from the property. Spray foam waste is classified as hazardous material under UK environmental regulations and must be disposed of correctly — it cannot simply be bagged and put in the wheelie bin.
After clean-up, the loft space is left clear, accessible, and ready for inspection. A surveyor walking into the space after removal should be able to see and assess the full roof structure without obstruction.
Step 7: Post-Removal Timber Check
With the foam gone and the loft clear, the team carries out a final check of the exposed timber structure.
This is where any hidden issues become visible for the first time. If the foam has trapped moisture over the years, there may be signs of damp, mould, or early-stage timber decay that were impossible to detect before removal.
If timber issues are found, the next steps will depend on the severity. Minor surface damp usually resolves with improved ventilation. More significant decay may require timber treatment or in some cases replacement before re-insulation.
This is also the stage where the restored roof structure is confirmed as accessible — which is the key thing lenders and surveyors need to see.
Step 8: Documentation
The final step is the one that makes everything official.
A completion certificate or written confirmation is issued confirming that the spray foam has been professionally removed and that the roof structure is now accessible and in acceptable condition.
This document is what your mortgage lender, equity release provider, or surveyor will ask for before reassessing your application. Without it, removal alone is not enough — you need written evidence from a qualified specialist.
Keep this document safely. If you sell the property in the future, any buyer’s lender may ask for it.
What Happens After Removal?
Two things typically follow professional removal:
Re-insulation — your loft will need new insulation. The alternatives to spray foam — mineral wool rolls, blown cellulose, or PIR boards — are all breathable, lender-approved, and typically cheaper to install than the spray foam was in the first place.
Mortgage or sale reassessment — once you have your completion documentation, your lender, surveyor, or estate agent can move forward. In most cases, removal resolves the issue and allows the mortgage or sale to proceed.
How Long Does the Whole Process Take?
From first contact to completion certificate, most straightforward jobs are resolved within 1 to 2 weeks. That includes the survey, scheduling, removal, and documentation.
If timber repairs are needed, or if the loft is unusually large or complex, it may take a little longer — but your removal company should give you a clear timeline at the quotation stage.
FAQs
Will the removal damage my roof tiles?
When carried out correctly by experienced specialists, tile damage is rare. The risk is much higher with DIY attempts or unqualified tradespeople who are not familiar with spray foam removal specifically.
Does open-cell or closed-cell foam take longer to remove?
Closed-cell foam generally takes longer due to its rigid bond and density. Your survey will confirm which type you have and what that means for timescales and cost.
Do I need to be home during the removal?
You do not need to be present throughout, but it is useful to be available on the first day and the final day — at the start for access and setup, and at the end to review the completed work before sign-off.
What if timber damage is found during removal?
Your removal specialist will advise you on the findings and options. Minor issues may not affect your mortgage outcome at all. More significant decay will need to be addressed, and your specialist can advise on next steps.
Will my loft need re-insulating straight away?
Not immediately — the loft can be left clear while you arrange re-insulation. However, you should not leave it uninsulated long-term, both for energy efficiency and to meet building regulations.
Want to understand what removal would involve for your specific property?
Most of our customers get a quote within 24 hours. No obligation, no pushy sales calls — just a clear picture of what removal involves and what it will cost.