Dealing with old, damaged, or poorly installed spray foam insulation in your loft? You’re not alone. Thousands of UK homeowners face this exact problem — especially those who discover that spray foam was applied to their roof timbers without proper surveys, leaving them with mortgage issues and structural concerns.
This guide walks you through everything you need to know about removing spray foam insulation from a loft safely, efficiently, and without wrecking your roof in the process.
What Is Spray Foam Insulation — and Why Do People Remove It?
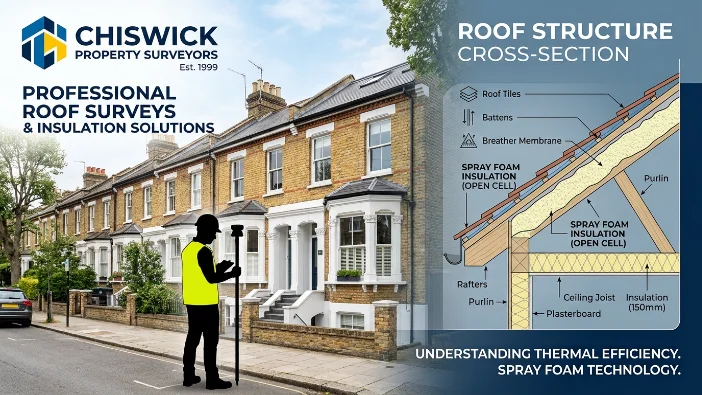
Spray foam insulation (also called SPF — Spray Polyurethane Foam) was widely marketed as a revolutionary way to insulate lofts and roof spaces. It’s sprayed as a liquid and expands to fill gaps, creating an airtight thermal barrier.
So why remove it?
Here are the most common reasons homeowners want it gone:
- Mortgage problems — Many lenders now refuse mortgages on homes with spray foam in the loft, making properties difficult to sell
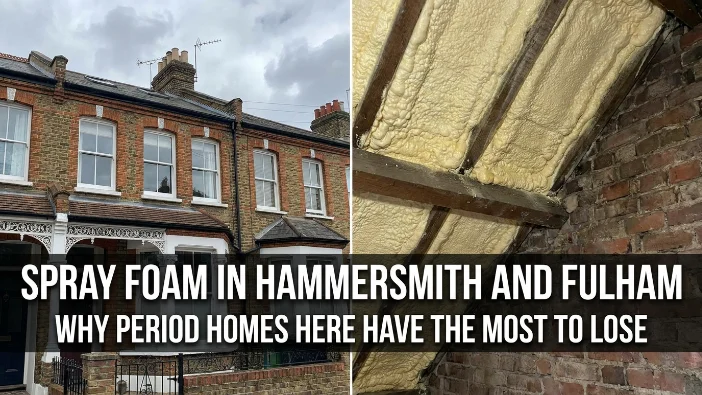
- Structural concerns — Open-cell foam can trap moisture against roof timbers, potentially causing rot
- Poorly installed foam — DIY or unregulated installations may have been done incorrectly
- Survey requirements — Surveyors increasingly flag spray foam as a risk
- Rafter damage hidden by foam — Foam can conceal timber decay underneath
Whatever your reason, removing spray foam insulation is entirely possible — but it’s not a simple weekend job. Let’s break it down properly.
Types of Spray Foam Insulation You Might Find in Your Loft
Before you pick up a tool, you need to identify which type of spray foam you’re dealing with:
1. Open-Cell Spray Foam
This is soft, spongy, and yellowish. It’s easier to remove because it doesn’t bond as aggressively to surfaces. You can often pull chunks away by hand or with basic tools.
2. Closed-Cell Spray Foam
This is harder, denser, and much more firmly bonded to rafters and tiles. It’s significantly more difficult to remove and often requires professional intervention. It can also be structurally bonded to roof timbers, meaning aggressive removal risks damaging the timbers themselves.
Knowing the difference matters enormously for planning your removal approach.
Can You Remove Spray Foam Insulation Yourself?
Technically, yes — but only in certain situations.
DIY removal may be feasible if:
- The foam is open-cell and relatively soft
- The foam was sprayed onto the loft floor (not the rafters/tiles)
- The foam is in good condition and not structurally bonded
- You’re comfortable working in confined, dusty spaces
You should hire a professional if:
- The foam is closed-cell and bonded to roof timbers or tiles
- You can see signs of timber damage underneath
- The foam has been sprayed directly onto the underside of tiles (this is common in unventilated “warm roof” applications)
- Your property survey flagged specific concerns
- You’re preparing to sell and need certified removal documentation
What You’ll Need: Tools and Safety Equipment
Whether you go DIY or assist a professional, understanding the tools involved is helpful.
Safety Equipment (non-negotiable):
- Respirator/dust mask rated for particulates (P2 or P3)
- Safety goggles or glasses
- Disposable coveralls
- Heavy-duty gloves
- Knee pads (you’ll be crawling)
- Hard hat if working near roof timbers
Tools for Removal:
- Utility knife or Stanley knife with spare blades
- Stiff wire brush
- Oscillating multi-tool (invaluable for cutting around bonded foam)
- Flat pry bar or wide scraper
- Angle grinder (for very stubborn closed-cell foam — professionals only)
- Heavy-duty refuse sacks
- Shop vacuum / industrial hoover
- Strong torch or head torch
Step-by-Step: How to Remove Spray Foam Insulation from a Loft
Step 1: Assess the Loft Before You Start
Put on your safety gear and get up into the loft with a good torch. You need to understand:
- What type of foam is present (open or closed-cell — feel it with your gloved hand)
- Where it has been applied (floor, rafters, tiles, or all of the above)
- Whether timbers look healthy (check for dark staining, softness, or crumbling wood — these are signs of moisture damage)
- The extent of the coverage — a partial application is much easier to deal with than a full roof spray
Take photos throughout. If you’re doing this for mortgage or sale purposes, documentation matters.
Step 2: Ventilate the Space
Spray foam removal creates dust, fibres, and potentially irritating particles. Open any loft hatches and install a temporary fan or ventilator if possible. This is especially important in summer when loft temperatures can exceed 40°C.
Step 3: Cut the Foam into Manageable Sections
Using your utility knife, score the foam into sections roughly 30cm x 30cm. This makes it far easier to peel, pull, and bag up. Don’t try to yank large chunks — you risk pulling tiles or timbers with it.
Work methodically from one end of the loft to the other. Keep your blades fresh — spray foam dulls them quickly.
Step 4: Peel and Remove the Foam
For open-cell foam, you can often peel it away in large sections by hand once scored. Grip firmly and pull steadily rather than jerking.
For closed-cell foam, you’ll need to use a stiff scraper or oscillating multi-tool to work under the foam and separate it from the surface. Go slowly. Aggressive force risks splintering rafters or cracking tiles.
As you go, bag all removed foam immediately. It’s bulky and messy — keep on top of it.
Step 5: Clean the Residue Off Surfaces
Once the bulk of the foam is removed, you’ll typically be left with a thin layer bonded to the timber or tile surface. This is the most time-consuming part.
Use a stiff wire brush to scrub residue off rafters. For tiles, work very carefully — cracked or broken tiles are a common side effect of aggressive foam removal.
Some contractors use heat guns to soften residue before scraping. This can work well but must be used cautiously near timber.
Step 6: Inspect the Roof Timbers
This is a critical step that many people overlook. Once the foam is removed, inspect every rafter and timber carefully:
- Press a screwdriver or penknife into the wood. If it sinks in easily, the timber is rotten
- Look for dark staining, black mould, or white fungal growth
- Check for any structural sagging or deformation
If you find significant timber damage, stop and call a structural engineer or roofing contractor before proceeding. Damaged rafters will need to be repaired or sistered before any new insulation goes in.
Step 7: Dispose of the Foam Correctly
Spray foam is not recyclable and cannot go in standard household bins. You have two main options:
- Skip hire — the most practical solution for large removals
- Bagged waste collection — some specialist waste contractors will collect pre-bagged foam waste
Check your local council for guidance on disposal. Some areas classify spray foam as trade waste depending on quantity.
Step 8: Consider What Comes Next
Once your loft is clear of spray foam, you’ll want to think about replacement insulation. The most commonly recommended alternatives are:
- Mineral wool (glass wool or rock wool) — affordable, widely available, good performance, easy to install
- Rigid foam boards — good for rafter insulation when used correctly with a ventilation gap
- Blown-in cellulose or glass wool — excellent for covering large areas efficiently
Whatever you choose, ensure it’s installed with proper ventilation — one of the key failures of many spray foam applications was eliminating necessary roof ventilation.
How Much Does Professional Spray Foam Removal Cost?
If you’re hiring professionals (which is often the wisest choice for closed-cell foam), expect to pay:
- £500–£1,500 for a small terraced house loft
- £1,500–£4,000 for a larger semi-detached or detached home
- £4,000+ for extensive or complex installations, especially where timber repairs are needed
Always get at least three quotes. Ask specifically whether the quote includes timber inspection, residue cleaning, and a written report (important if the removal is for mortgage or sale purposes).
Common Mistakes to Avoid
- Rushing the job — slow, careful removal protects your roof timbers and tiles
- Skipping the respirator — foam dust is genuinely hazardous to your lungs
- Ignoring timber condition — removing foam and re-insulating over rotten rafters is a costly mistake
- Not documenting the work — if you’re selling the property, you’ll need evidence of proper removal
- Using heat guns near dry timber — fire risk is real in a loft environment
Final Thoughts
Removing spray foam insulation from a loft is a serious job — but it’s absolutely achievable with the right approach, tools, and patience. Whether you tackle it yourself or bring in professionals, the key is to work carefully, prioritise safety, and always inspect the underlying timber before re-insulating.
If your goal is to sell your home or remortgage, professional removal with proper documentation is almost always the right choice. The upfront cost is worth it compared to a failed sale or refused mortgage application.
Got the foam out? Great — now you’ve got a clean slate and can insulate your loft properly, the way it was meant to be done.
FAQs
Does spray foam removal invalidate my roof warranty?
Most spray foam applications already voided the original roofing warranty. Check your original warranty documents carefully.
Can spray foam removal damage roof tiles?
Yes — this is one of the biggest risks, especially with closed-cell foam bonded directly to tiles. Professional removal minimises but doesn’t eliminate this risk.
Will my house be unmortgageable until the foam is removed?
Many lenders will refuse to lend until foam is removed and a clean survey certificate is provided. Some specialist lenders may consider properties with foam in place, but options are limited.
How long does spray foam removal take?
A small loft typically takes 1–2 days. A larger or more complex job can take 3–5 days.
Is there a certificate I can get after removal?
Yes. Reputable removal companies provide a completion certificate and photographic evidence, which you can present to mortgage lenders and surveyors.